Complete Any Subdivision Project Successfully With This 12-Step Subdivision Flowchart!

How would you like to have access to my subdivision flowchart… containing the exact 12 steps I use every time I subdivide property?
In my 10 years of investing in property, I’ve come to realise one thing, and it applies to all investing strategies:
You Need To Have A System For Everything You Do!
I'm pulling back the curtain, revealing my best kept Deal Finding Secrets!
- My Secret Search Strategies: Unlock hidden cracker deals no one else knows about
- Stop wasting hours on research: Simple setup automatically hunts down hot deals for you!
- How to use Australia’s top research tool anytime to turning boring research into an exciting treasure hunt
- Bonus: Free Research Tool Credits Included!
🎯 Don’t miss this!
You must build a process for everything so that you can replicate your success and learn from your failures.
That means building a Standard Operating Procedure for everything… including tasks like:
- Becoming an area expert
- Applying for finance
- Submitting offers
- Due diligence
- Crunching numbers
- Engaging contractors
- Implementing add-value strategies
- The list goes on
So today I want to help you out by giving you one of my own processes that I’ve been using for many years – my subdivision flowchart.
I chose to focus on my subdivision process because I got so much great feedback from my recent blog post where I broke down all the costs to subdivide property in QLD.
By the way, if you missed that blog post, here’s the link again: www.propertyresourceshop.com/strategy-subdivision-cost-qld
Anyway, as I was saying, I’m about to share with you my own 12-step formula for subdividing property. I’m taking this directly from my most popular resource, the Subdivision Masterclass from inside the Ultimate Property Hub Membership Site … you’re welcome! 🙂
Why Am I Giving You My Coveted 12-Step Subdivision Flowchart For Free?
Very simple. Subdivision has turned my life 180°. My first subdivision deal allowed me to make $45,498 in 9 months… while holding down a full-time job in Brisbane as a postie… and… I’m certain YOU can do the same anywhere in Australia and with even greater financial success…
…because you won’t have to make the same mistakes I’ve already made!
For me, subdivision meant I was able to tell the boss to “shove it!” and later move with my family to France – all by simply following the process I’m about to show you.
So what will you gain from reading this and understanding the process?
One word: Clarity.
Clarity gives you direction. Once you see there’s a structured process to subdividing property… once you can break down each component into bite-size chunks… suddenly it all seems possible!
So let’s take a quick look…
12 Steps To Getting Your Subdivision In & Out Of Council As Fast As Humanly Possible
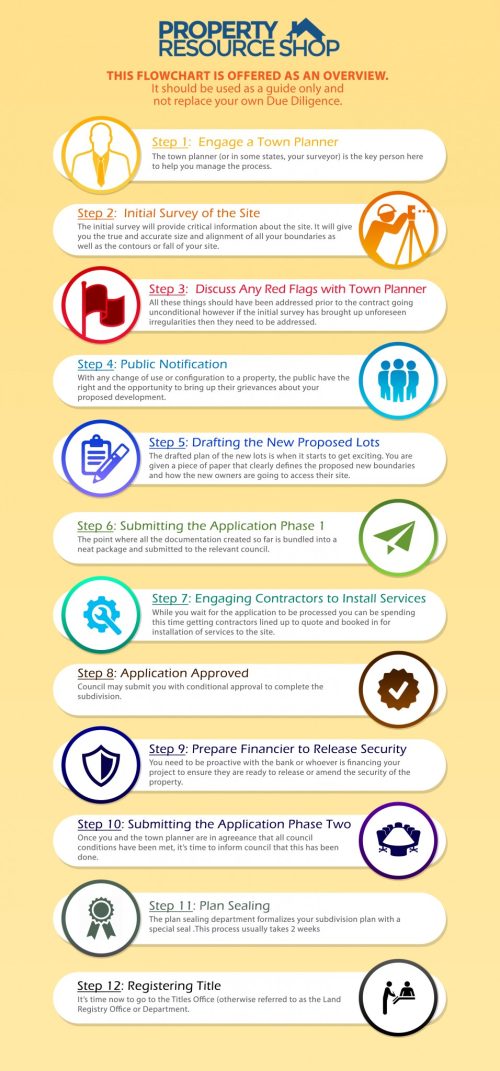
First, here’s the infographic that will help you visualise the process from start to finish. Beneath it you will find a more detailed explanation of each step:
Now that you’ve reviewed the infographic, let’s dig deeper into each step in the process:
- Engage a town planner – having a great team is everything and a town planner (sometimes referred to as a surveyor in Victoria) is your main ‘go-to’ person in a subdivision. Explain to your town planner/surveyor what you are trying to achieve and have them do up a fee proposal for you. A good town planner will also include any extra costs outside of their fees like council contributions and the relevant development and application fees.
- Initial Survey of the site – This will give you the true and accurate size and alignment of all your boundaries as well as the contours or fall of your site. Your town planner will use this document as the basis of all paperwork moving forward.
- Discuss any red flags with the town planner – Good communication is critical here and the town planner should be making you aware of unforeseen irregularities before the purchase contract is unconditional. EG. Significant trees, bus stop or council sign obstructing proposed access, fire hydrant proximity, footpaths to install, location of underground services etc.
- Public Notification – With any change of use or configuration to a property, the public has the right and the opportunity to bring up their grievances about your proposed development. Your town planner should manage the process of notifying local residents of your intentions.
- Drafting the newly proposed lots – this is an exciting moment! The town planner arranges for a draftsperson to provide you with a document that clearly defines the proposed new boundaries and how the new owners are going to access their site. Ensure you understand what is presented on the plans and ask questions if unsure.
- Submitting the application Phase 1 – This is largely done by the town planner and is basically the point where all the documentation created so far is bundled into a neat package and submitted to the relevant council. Some states like Victoria expect you to have a concept plan drawn up of what will potentially be built on the site.
- Engaging contractors to install services – arrange for contractors to quote and then booked in for installation of services to the site. Among other installations, tasks such as sewer, water, stormwater, driveways and fencing will need to be organised.
- Application Approval – Assuming the council says yes to your application to subdivide, receiving the conditional approval from the council can be a little daunting as there may well be a list a mile long that needs to be adhered to. This is where your town planner comes in to help you manage the process in a timely manner. The council may also ask you to apply for an operational works permit if there are substantial earthworks or structural elements to be managed onsite
- Prepare financier to release security – Since you are cutting a block up into smaller parcels, the security on which your lending would be based on is going to change, meaning you need to change the agreement you have with your financier. Don’t miss this small, but important, step!
- Submitting the application Phase 2 – Once you and the town planner are in agreeance that all council conditions have been met, it’s time to inform the council that this has been done. Your town planner will again manage this process and it is at this point you will need to pay your council contribution costs and any other associated fees. Make sure you are cashed up!
- Plan sealing – You’re almost there! Once all conditions have been approved, the plan sealing department formalizes your subdivision plan with a special seal that confirms the development department of the council is satisfied.
- Registering Title – You have the sealed plan in your hot little hands and it’s time now to go to the Titles Office and register your newly created block(s) of land. To accompany the sealed plan you may need some documentation from your solicitor that details any easements.
What You Should Do If You Don’t Know How To Find A Deal
As you can see, the above steps show what you need to do once you have a deal on your hands. If you don’t have a deal yet or aren’t sure how to find a solid one, I strongly recommend checking out my 9-to-5 Property Investor Action Plan.
And in any case, try not to be overwhelmed with the above tasks.
Focus on the smaller steps you need to take while keeping the big picture in mind. If you don’t have a deal, the first step is to learn how to find one. But if you do have a deal, the next step is to put the above flowchart to use.
So Print This Subdivision Flowchart Now And Keep It Somewhere You’ll See It Often!
When I did my first subdivision, I didn’t have a process or plan of attack. I just fumbled my way through, making mistakes until I got to the other side.
These days I refer to the 12-step flowchart on a regular basis to remind me of just how straightforward the process can be.
Sure, there are going to be complications along the way, detours to take and challenges to overcome. But bringing it back to this 12-step flowchart keeps things in perspective so that you continue to move forward.
Time can be your biggest enemy when subdividing property as holding costs will erode your profit quickly… so keeping the process front of mind will ensure you are always on the front foot. Once you have a process it’s easy to replicate again and again.
There’s No Need To Reinvent The Wheel, And This Ain’t Rocket Science!
Just make sure you download the 12-Step Subdivision Flowchart above (just click on the image) and start simplifying your journey to creating wealth.
And if this flowchart seems a bit advanced, or if you’re not sure where or how to start your property investing journey… then you should start here: Here’s how I made $45,498 in 9 months while holding down a full-time postie job… and told the boss to “shove it!”
Cheers,
Matt
Looking for proven ways to create profits in the current market?
You'll find over 200 step-by-step case project studies, our renowned Master Classes and Property Crash Courses… and heaps more!
Try the Ultimate Property Hub now


Nice 1 Matt